Ask For A Proposal
Ask Us For
A Proposal

Every home brewer can undoubtedly recall memorable fermentations. Batches that got ‘infected’; maybe you were a bright eyed, novice brewer eagerly awaiting to sample your finished beer; only to find that the sips tasted of butter, vomit, and nail polish flavors, and slowly you came to the sad realization that this batch is better off dumped. Batches that ‘stalled’; maybe you checked in on the glass carboy saying to yourself “surely it has to be bubbling now” and sigh yet again, “no, no it is not.” Or ‘overly vigorous’ batches; maybe you walked into your room to grab a shirt from the closet, only to find that you actually didn’t have anything to wear, because your clothes were covered in yeast and wort, with your carboy mysteriously missing an airlock. Oh the memories.
‘Good’ fermentations will most likely not be as memorable as these ‘bad’ examples mentioned above (okay fine, maybe some of them happen to be real experiences, and not just ‘examples’). ‘Good’ batches are instead remembered by the enjoyable experience of actually drinking the beer.
Explaining just how important yeast is, while somewhat downplaying the brewer’s role in the overall process, a well-known brewing science teacher once said that “any idiot can make sugar water.” Though, we know from the last articles, that many ‘hot side’ quality assurance measures must be taken to create quality wort…but I digress. The point is this: Yeast is a beast. Brewers make the wort, but the yeast makes the beer.
It is easy to take for granted the immense biochemical changes that happen as the solution moves from sugar water to beer. But it is really quite remarkable: As brewers we are knowingly controlling a living organism (many, many of these organisms in fact) and are subjecting them to various conditions, in order to create the end product that we know and love. It could then be argued that early brewers, bread makers, cider makers, etc. were actually some of the first biochemists.
So let’s get into the basics of fermenting on a commercial scale, because we know that ‘bad’ commercial fermentations aren’t just an ‘oh well, better luck next time’ experience, but instead can translate to immense financial losses.
First, a quick note on yeast ‘pitching’. Perhaps you are just making the leap from home brewing to a commercial setting. You are likely aware that pitching on a commercial scale is typically not as simple as snipping the top off of a yeast packet and dumping it into a carboy. A yeast ‘pitch’ (or a specific amount of yeast) should be well calculated, and ideally added to the wort as it is moving into the fermenter.
Calculating accurate yeast pitches can be intimidating at first glance. However, in an industry built on sharing knowledge, you will find many excellent resources to help guide you through the steps. Take the time to understand different pitching rates; how they affect the end beer, and what works best for your brands. The same goes for understanding oxygen additions and successfully harvesting or propagating yeast. As you continue to get a grasp on yeast handling (arguably one of the most important steps within the entire process), you will hopefully develop ‘tried and true’ methods for maintaining healthy cultures on your system.
Commercially speaking, yeast is commonly added in the following ways:

Photo: Kegs like the one above are commonly repurposed and used as ‘yeast brinks’ for smaller breweries. The valve at the bottom of the tank can be hooked up in line with the knocked out wort. The yeast can then be ‘pushed’ in with the knocked out wort via pressure (CO2) from the top of the tank.
Let’s assume that you have a properly cleaned and sanitized fermenter, freshly filled with wort (hopefully of high quality) and yeast (hopefully healthy). So that’s it right, just sit back and relax now? Well, yes and no. You may have some downtime after filling…so either find something to clean, or find a pint glass to fill.
Now it is important to be aware of the specific phases that the yeast will undergo. Each phase will undoubtedly bring about more ‘to dos’ for you as brewer.

Photo: Brewing literature commonly addresses these above phases (lag, log, stationary, and death) in beer fermentation.
Phase 1: Lag.
Imagine you are asleep, and wake up surrounded by countless other people and a gigantic buffet of food releasing mesmerizing aromas. You’d be a little bit confused at first, right? And surely ask “what the hell am I doing here?” But how long would it take you to start eating the delicious buffet in front of you? If you answered “not long” then this would be a short ‘lag phase’ for you.
This is essentially what yeast cells are subjected to upon being pitched into fresh wort. If harvested off of a tank (and then stored prior to pitching), or still in the package, yeast should be stored in a cold environment to keep cells in a dormancy phase. Yeast that are warmed without nutrients and food, will go into ‘survival mode’ and begin using reserves within the cell. Because of this, the entire slurry (liquid yeast) will begin to decrease in viability (alive cells divided by total cells) as cells begin to die.
Whether just coming out of dormancy phase, or having just recently finished fermenting a previous batch, this sugary environment (fresh wort) is new to the yeast cell. As it begins to adjust to this new setting, it also begins taking up any available nutrients in the wort; among these, dissolved oxygen (DO).
Yeast will then begin using DO it has just absorbed to create sterols. Sterols are a nutrient utilized by yeast to increase cell wall permeability. By becoming more permeable, yeast cell walls can more readily take in sugars, and release alcohols. Consumption of oxygen at this early stage can happen under 30 minutes after the yeast is pitched, this is referred to as aerobic fermentation. Note that aerating knock out wort is typically the only time in the entire process (brewing and cellaring) where it is desirable to add oxygen.
Once the oxygen has been consumed, an anaerobic (non-oxygen) environment has been created, and yeast then switch to anaerobic fermentation. With this switch, the yeast then divert their resources to consuming the abundant amount of sugars all around them. The oxygen can therefore be viewed as an appetizer before the feast, if you will.
Phase 2: Log.
Remember the airlock popping off the carboy ‘example’ mentioned above? Something like this would occur in the ‘log phase’ (which also may be referred to as the ‘exponential growth phase’). Here, unsurprisingly, the actual yeast cell numbers are growing exponentially, as ‘mother’ cells ‘bud’ and break off ‘daughter’ cells, many of those daughter cells then repeat this cycle.
As yeast consume the sugars available, large amounts of CO2 and foam can be produced, hence blowing the airlock off of a home brew carboy, or commercially, having a tank ‘foam over’. Foam overs like this should be avoided, not only can they be messy, but can translate to lost beer, and potentially loss of foam positive compounds for the end beer; so ensure your fermenter has proper headspace.
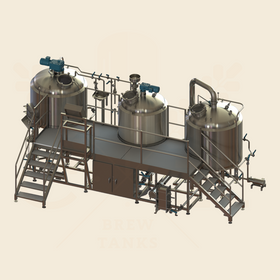
Other than CO2, yeast are creating many other byproducts during this phase, among those are ‘good’ as well as ‘bad’ flavor compounds, various alcohols (including ethanol), and heat. Like humans, yeast release heat as they metabolize food. This is extremely important to remember, as temperature directly affects fermentation, and can positively or negatively influence the resulting beer. Commercial fermenters are typically equipped with glycol cooling ‘jackets’ for this reason. Different yeast strains will have varying ideal fermentation temperatures, but generally speaking, strains will produce more esters and fusel alcohols at higher temperatures. This should be taken in to consideration when determining the flavor profile of the beer you are making.

As a brewer, one task to perform during log phase is a ‘trub off’, through the conical bottom of the fermenter. A proper whirlpool, rest, and knockout will keep most hot side trub (coagulated proteins) out of the fermenter, but some will inevitably carry over to the fermenter with most systems. There is varying debate as to whether or not this trub causes off-flavors in the end beer. Setting that debate aside, trub should be removed because its denseness causes it to sink to the bottom of the fermenter, and will inhibit processes like yeast harvesting or dumping dry hops later.
Phase 3: Stationary.
If using a ‘blow-off bucket’ (a bucket usually filled with sanitizer and connected with a hose to the top exhaust of the fermenter) brewers will notice active ‘rumbling’ through the sanitizer, during the log phase. As growth slows and the yeast transitions to the ‘stationary phase’, brewers will then notice this rumbling turn into slow and steady CO2 ‘burping’ through the sanitizer. These ‘burps’ will eventually subside too, and hardly any CO2 activity will be noticed.
Though active fermentation may have stopped, many other positive changes are occurring during the stationary phase. For example, diacetyl (a buttery off-flavor naturally produced by yeast) can be reabsorbed into the cell and converted into a non-detectable flavor compound. Hydrogen sulfide (also naturally produced by yeast) continues to escape out the top of the fermenter during this stage too.
In a commercial setting, time is always an imperative factor regarding efficient production, as more annual fermenter fills translates to more profits. For this reason it can look appealing to shorten the stationary phase. Be careful in doing so however, as shortening too much can risk similar quality implications mentioned above. Tests to monitor the reduction of some of these off-flavors are commonly done by quality focused breweries. Once reduced to optimal levels, the beer can then move on to the next step.
Phase 4: Autolysis.
Mentioned early, as yeast sits at room temperature, without nutrients and a food source, cells will begin to tap into internal reserves, which in turn stresses the cell out, and likely causes it to die (or autolyze). Dead cells lower the viability of the entire yeast slurry. A high viability slurry is optimal, as healthy yeast makes the best beer.
Once brewers have ensured a proper stationary phase, it is therefore ideal to get the yeast off of the beer, and into a cold environment or a fresh batch of wort. Autolysis is worth discussing, but ideally brewers avoid this phase all together.
Upon completion of the stationary phase, brewers commonly ‘crash’ (reduce) a tank’s temperature, doing so with glycol jackets described earlier. This is done for multiple reasons: Crashing encourages yeast flocculation (grouping together of individual cells). More cells equals a denser ‘particle’, which means a faster settling rate into the conical bottom of the fermenter. This is ideal, especially if harvesting this yeast for another batch; colder temperatures ensure that healthier cells (which tend to stay in solution longer) are also harvested too. Lastly, we know from earlier that subjecting the yeast to colder temperatures allows for increased storage time in between batches, as the cells transition into a dormancy phase.
Whether you are new to commercial fermentations or are a seasoned cellaring veteran, there is always something to learn from the ingredient that makes it all possible; yeast. The vast number of unique yeast strains available, along with different cellaring techniques makes fermentation an optimal step in differentiating your beers from other breweries. Even if it may be the thousandth time you fermented a particular brand; treat every fermentation with respect and diligence. Monitor gravities, pH, dissolved oxygen (if you can invest in a DO meter) and flavor regularly. Oh, and never forget your humble, maybe messy, home brewing roots.
Happy Brewing.
Photo References:
Yeast Brink:
Yeast Phases:
https://slideplayer.com/slide/12503572/
Fermenter with Glycol Jackets: